- 5 Minutes to read
- Print
- DarkLight
- PDF
User Management
- 5 Minutes to read
- Print
- DarkLight
- PDF
If a user is in your MIS, they will be automatically synced to your platform's user list as a 'Staff' user for that school, and more roles can be added as you wish. Please ensure that the users' email addresses are correctly stored in the MIS, as updating them individually post-sync is possible, but less efficient.
For more information on how roles work at Progress Teaching, log onto your platform, then click here.
Understanding the User Management page
To manage your users, navigate to Settings > User Management > School Users
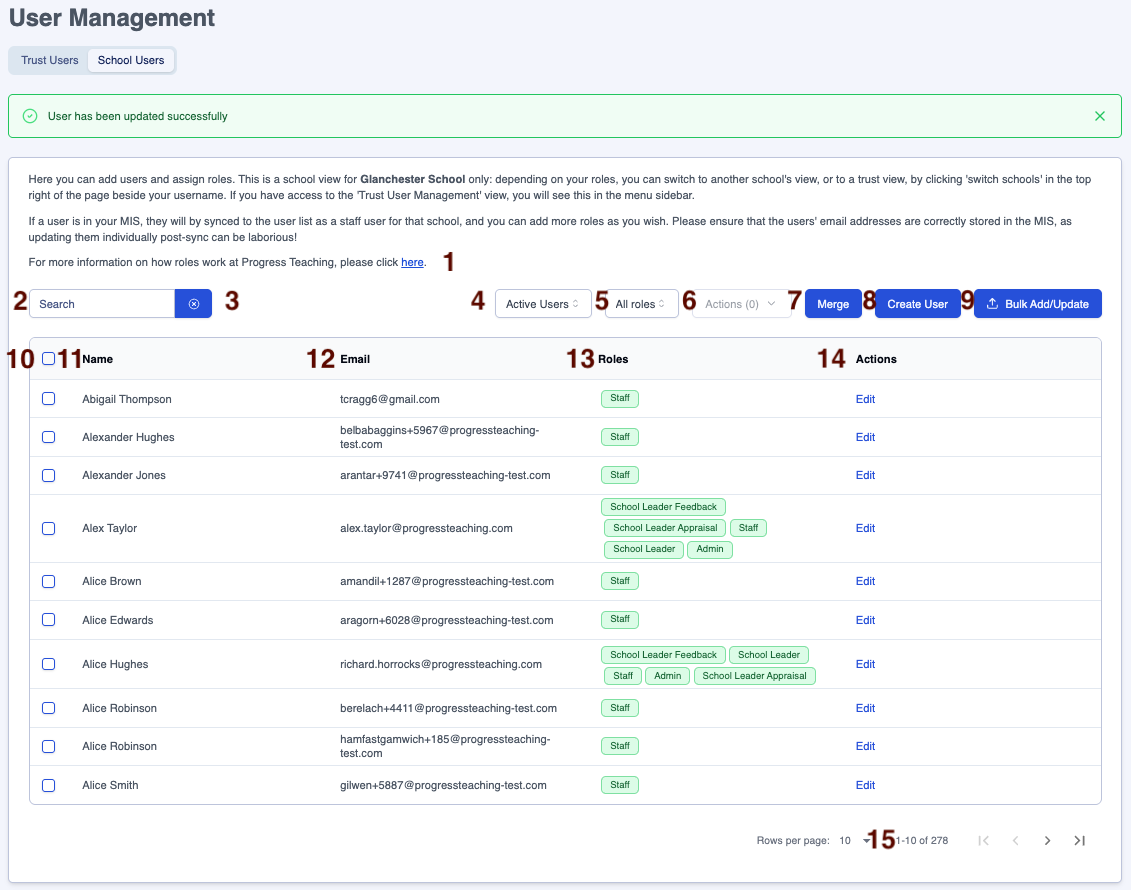
Below is a key with descriptions of all the features available on the User Management page:

| Area | Feature description |
|---|---|
| 1 | Link to the page explaining how ProgressTeaching roles work |
| 2 | Search for users by name, email, or role |
| 3 | Click on the 'x' next to the 'Search' box to clear the contents |
| 4 | Filter the page for active / inactive users |
| 5 | Filter the page for different roles |
| 6 | Tick in one or more user's box, then use the 'Actions' menu to edit their status |
| 7 | Use Merge to merge multiple accounts from the same user together |
| 8 | Use Create User to manually create new accounts |
| 9 | Use Bulk Add/Update to bulk add or bulk update user accounts |
| 10 | Use the multi-select boxes with Edit Selected (#) [4] to edit multiple users |
| 11 | Account names, pulled from MIS, click the column heading to sort |
| 12 | Email addresses, pulled from MIS, click the column heading to sort |
| 13 | Assigned roles, click the column heading to sort |
| 14 | Accounts can be edited using their row in the Actions column |
| 15 | Adjust the number of rows on a page to suit your needs |
User Roles
Roles can be assigned to users to give the following levels of access:
| Name | Description |
|---|---|
| Admin | Full access to all school records, dashboards, and individual staff records for Feedback and Appraisal. Can see and amend Settings for any module within the school. Cannot give feedback or appraise without Staff role and relationships. They can delete feedback and appraisal records however. |
| Middle Leader | This role is designed for roles like Head of Department or Head of Year, who need to support and analyse staff within a specific subject/year group or group of subjects/year groups. Can access dashboards and feedback data for records they have permission to view (as configured in Settings > Feedback Users). These permissions also govern the feedback they can give. Middle Leaders cannot see whole-school data unless they also have a higher level role (e.g. one of the Leader roles, or Admin). |
| School Leader | Full access to all school records, dashboards, and individual staff records for Feedback and Appraisal. Cannot give feedback or appraise without Staff role and relationships. The role does not grant Settings access. |
| School Leader Appraisal | Full access to all school records, dashboards, and individual staff records for Appraisal. Cannot give feedback or appraise without Staff role and relationships. The role does not grant Settings access. |
| School Leader Feedback | Full access to all school records, dashboards, and individual staff records for Feedback. Cannot give feedback or appraise without Staff role and relationships. The role does not grant Settings access. |
| Staff | Can give feedback, be coached, be appraised, see school dashboards, but not other people's records unless they have relevant roles or relationships. The role does not grant Settings access. |
Editing accounts individually
Use the 'Edit' hyperlink on the row for an account to:
- Amend the display name
Only manually created accounts can have their display name adjusted in the platform. Accounts synced from your MIS must be updated in the MIS, the change will be reflected in the platform the following day.
- Adjust the email address
Only manually created accounts can have their email address adjusted in the platform. Accounts synced from your MIS must be updated in the MIS, the change will be reflected in the platform the following day.
Assign and remove roles

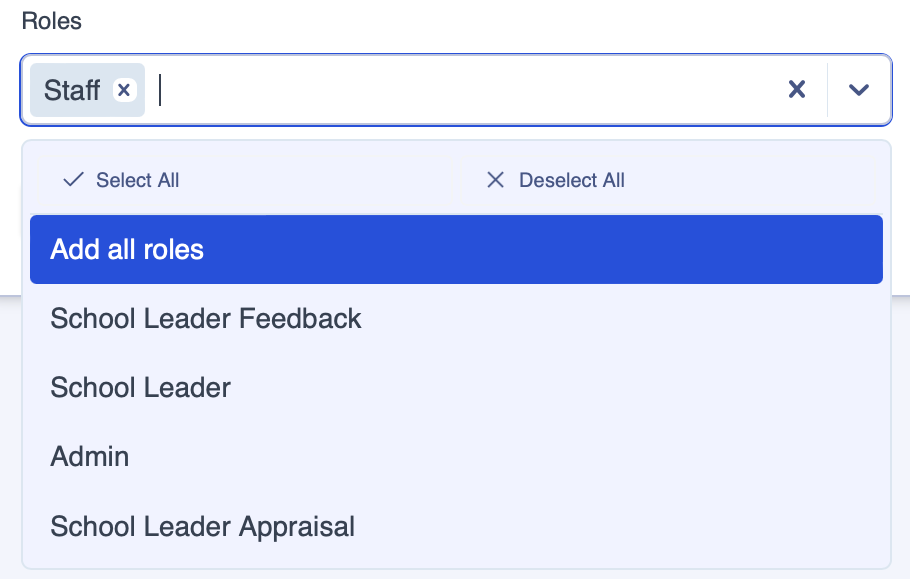
- The 'X' on the right-hand side of the 'Roles' box clears all assigned roles. When you click in the Roles box you will see all the available roles. These can be assigned individually by repeat clicking a role, then clicking again in the 'Roles' box to see the list of remaining roles. You can also use the 'Select All', or 'Add all roles' options. Roles can be individually removed by clicking the 'X' next to the role name.
If there are accounts that exist in your MIS that should not have access to the platform, click in the box next to the user's name then use the 'Actions' menu to 'Soft Delete' their account.
Save any changes by clicking the 'Submit' button.
Click on 'Cancel' to return to the Settings > User Management page without making any changes.
Editing accounts in bulk
Changes to roles and account activity can be make in bulk by using the 'Actions (#)' button. This will allow you to assign roles and make users inactive in bulk rather than individually.
Manually creating users
If you need to give access to anyone that does not have an account in your MIS, this can be achieved by clicking on the 'Create User' button. You will need to assign the account with:
- Display name
- Email address
- Role(s)
Click on the 'Submit' button to save your changes.
Adding and updating accounts using a CSV file
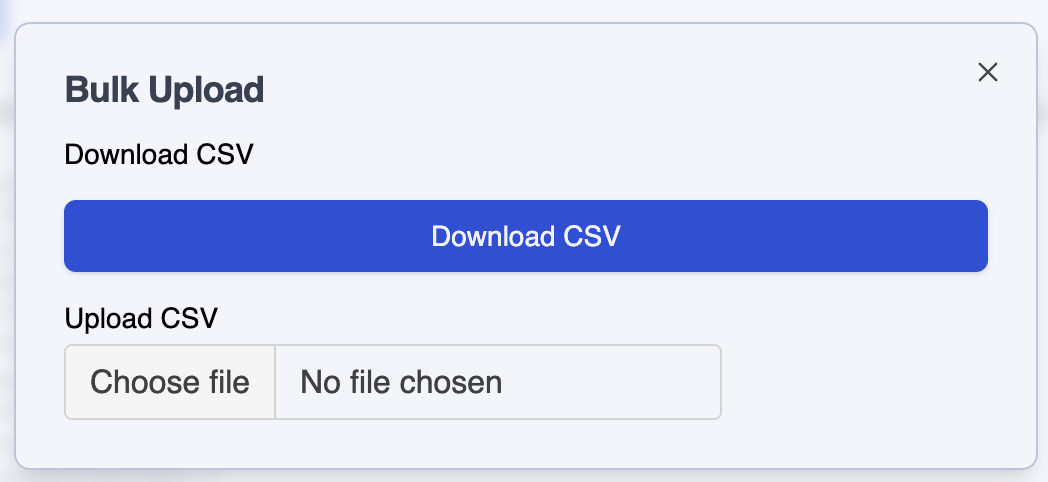
If you want to use a spreadsheet to make additions or amendments to accounts there is a feature to do this accessed via the 'Bulk Add/Update' button. Clicking the button takes you to a 'Bulk Upload' dialogue box:

- Download the 'bulk-user-data' spreadsheet by clicking the 'Download CSV' button, which exports a list of the existing accounts from the platform with:
- Id - the unique identifier for the account
- Name - the name from the MIS
- Email - the email address from the MIS
- Roles column - the account row will show any assigned roles
- Edited - true or false column to show if the account has been edited
- Add or amend the users on the spreadsheet as required, then make sure you save your spreadsheet
- Click the 'Choose file' button, which will allow you to browse to the CSV file that you have downloaded and amended so that it can be uploaded back into the platform to action the changes you have made.


